学习指南 · 2026 版
CDL General Knowledge — Complete Study Guide (2026)
The written General Knowledge test every commercial driver must pass.
- 篇幅
- 72 页
- 书内练习题
- 55
- PrepPass 在线计时模考
- 50 题 · 60 分钟
- 考试事实核对于
- 2026年9月
- 文件最后更新
- 2026年10月
- 交付
- PDF + EPUB · 英文 · 即时下载
关于本书
The written General Knowledge test every commercial driver must pass — safe driving, inspection, control, cargo, and the current federal Hours-of-Service rules.
考试事实、适合谁与变化
关于这场考试本身
| 主管机构 | Federal Motor Carrier Safety Administration (FMCSA) standards; tests given by each state's driver licensing agency |
|---|---|
| 题目数量 | 由各州规定。联邦规则要求每份试卷含固定题数并按知识领域分配,但本身未规定具体题数;请查阅所在州的 CDL 手册。 我们查阅但未找到该数据的来源: eCFR — 49 CFR Part 383, Subpart H (§ 383.133 Test methods; § 383.135 Passing knowledge and skills tests), current as displayed |
| 考试时限 | 联邦规则未规定知识考试时限;如有时限,由州规定。 我们查阅但未找到该数据的来源: eCFR — 49 CFR Part 383, Subpart H (§ 383.133 Test methods; § 383.135 Passing knowledge and skills tests), current as displayed |
| 及格标准 | 80% |
| 费用 | 由各州驾照机构规定;联邦规则不收考试费。 我们查阅但未找到该数据的来源: eCFR — 49 CFR Part 383, Subpart H (§ 383.133 Test methods; § 383.135 Passing knowledge and skills tests), current as displayed |
| 考试语言 | 49 CFR 383.133(b)(3) 允许州以外语进行知识考试,但不得使用口译;提供哪些语言由各州决定。路考须以英语进行。 我们查阅但未找到该数据的来源: eCFR — 49 CFR Part 383, Subpart H (§ 383.133 Test methods; § 383.135 Passing knowledge and skills tests), current as displayed |
翻开这本书看看
三页真实内页,直接从你将下载的 PDF 渲染而来 —— 依次是一页速查、一页讲解、一道带解析的例题。没有任何一页是为了好看而重画的。
- 速查页Chapter 1 — Safe Driving: Speed, Space, and Seeing Hazards · PDF 第 15 页
一页可以随时翻回来的内容:把数字、期限或术语集中在一处。
- 怎么讲Chapter 1 — Safe Driving: Speed, Space, and Seeing Hazards · PDF 第 12 页
讲解页:用文字把知识讲清楚,顺序与考试考查的顺序一致。
- 怎么讲Chapter 1 — Safe Driving: Speed, Space, and Seeing Hazards · PDF 第 13 页
讲解页:用文字把知识讲清楚,顺序与考试考查的顺序一致。
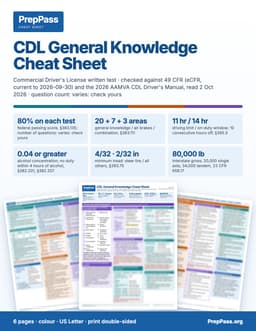
两周内就要考试?
这本指南是系统讲解,要花几周读。如果两周内就考,可打印的彩色速查表是另一款产品:考试涉及的关键数字,按章节排好。
6 页 · US Letter · 可打印 PDF · 永久保存
包含什么,不包含什么
包含
- Safe driving: stopping distance, following distance, hazard perception
- Vehicle inspection, basic control, and air-brake fundamentals
不包含
- 不寄送纸质书 —— 这是一份你下载后可自行打印的文件
- 购书不含视频课程、讲师或一对一辅导 —— 站上的免费视频是另一回事
完整的包含项与不包含项
包含
- Hours of Service to the current federal rule (11/14/30-min/60-70/34)
- Cargo securement, weights, placards, and hazmat/emergency basics
- 55 original practice questions with answer explanations
- PDF (print & tab it) + EPUB (phone / e-reader)
不包含
- 不含考试报名费与考点费用,这些仍需向官方机构缴纳
目录
查看 7 个部分及各部分起始页
- Chapter 1 — Safe Driving: Speed, Space, and Seeing Hazards第 9 页
- Chapter 2 — Vehicle Inspection: Pre-Trip, En-Route, and Post- Trip第 18 页
- Chapter 3 — Basic Vehicle Control: Shifting, Backing, Turning, and Coupling第 26 页
- Chapter 4 — Emergencies, Fires, Cargo, and Hazardous Materials第 33 页
- Chapter 5 — Hours of Service, Licensing, and Driver Fitness第 40 页
- Practice Exam — 55 Questions第 47 页
- Answer Key with Explanations第 64 页
取自你将下载的那份 PDF,并标明各章起始页 —— 不是在此手工录入的。
免费读完整一章
完整的一章,与电子书正文一字不差。直接在此窗口滚动阅读;无需下载,无需邮箱。
在本页直接阅读第 1 章
More questions come from safe driving than from any other topic, because almost every large-truck crash traces back to speed, following distance, or a hazard the driver saw too late. A loaded tractor-trailer can weigh twenty times what a car weighs, and that weight changes how it stops, how it turns, and how much room it needs. Everything in this chapter — stopping distance, following distance, grades, night and weather, skids, crossings and work zones — runs on one idea: you cannot change physics, so you manage speed and space to stay inside what physics allows.
1.1 Stopping Distance and Speed Management
Total stopping distance has three parts, and the test wants you to know all three by name. Perception distance is how far you travel from the moment a hazard appears until your brain registers it — roughly three-quarters of a second for an alert driver. Reaction distance is how far you travel while you move your foot to the brake — another three-quarters of a second. Braking distance is how far the vehicle travels once the brakes take hold. At 55 mph on dry pavement those three parts add up to about 300 feet, longer than a football field, and a loaded vehicle needs more.
The single fact examiners test most often is that braking distance grows with the square of speed. Double your speed from 20 to 40 mph and braking distance becomes roughly four times longer, not twice as long. This is why a modest speed reduction in bad conditions produces a large safety gain, and why a small increase in speed on the highway costs far more stopping distance than it feels like it should.
Weight matters too, but not the way most people expect. An empty truck often stops in a longer distance than a loaded one, because brakes and suspension are engineered for a full load, and a light vehicle has less weight pressing its tires into the road, so its wheels lock up sooner. Never assume a light load makes you safer.
Surface is the last variable. Wet pavement can double stopping distance, packed snow multiplies it further, and ice can require up to six times the normal distance. Bridges, overpasses, and shaded stretches freeze before the surrounding pavement. The accelerator is the only control you have over all of this, so match your speed to the surface, the visibility, the traffic, and the weight behind you — not to the posted limit, which is a maximum for ideal conditions only.
1.2 Managing the Space Around Your Vehicle
Space is the one thing you can always add, and it is what buys you time to react. The rule for space ahead is one second of following distance for every 10 feet of vehicle length at speeds below 40 mph, plus one additional second at speeds above 40 mph. A 40-foot straight truck needs 4 seconds at 35 mph and 5 seconds at 55 mph; a 60-foot combination needs 6 seconds under 40 mph and 7 seconds above it. You measure it by watching the vehicle ahead pass a fixed object — a sign, an overpass shadow — and counting the seconds until your own bumper reaches the same point. Add at least one more second in rain and more in snow or fog.
Space to the sides matters just as much. Staying centered in your lane keeps a cushion on both sides so a drifting driver cannot trap you, and it preserves an escape path if the lane ahead is blocked. Space behind is harder to manage because you cannot control tailgaters, but you can stay to the right, hold a steady speed, and increase your own following distance so you never have to brake hard in front of someone following too closely. If a driver cuts into your cushion, the only useful response is to ease off the accelerator and drop back to rebuild it — flashing lights or closing the gap escalates the situation without restoring your stopping distance.
Overhead space is the dimension drivers forget. Loads settle, roads are repaved, and posted clearance signs are not always accurate, so know your vehicle's height and treat any marginal clearance as too low.
1.3 Curves, Grades, and Mountain Driving
Posted curve speeds are set for passenger cars, and a tall, heavy vehicle with a high center of gravity can roll over well below the speed at which a car would begin to slide. The safe practice is to slow to roughly 10 mph below the posted curve speed before you enter, complete all braking while you are still traveling straight, and then accelerate gently through the curve so the drive wheels stay loaded. Braking in the middle of a curve is what turns a manageable situation into a skid or a rollover.
Downgrades demand the same discipline in reverse. Gravity acts as an accelerator you cannot lift off, so you must choose a safe speed and select a low gear before you start down. Once you are descending it may be physically impossible to shift into a lower gear, and a driver stuck in neutral halfway down a mountain has no engine braking at all. The correct braking technique on a grade is snub braking: apply the brakes firmly enough to feel a definite slowdown — about 5 mph below your chosen safe speed — then release completely and let the vehicle build back up before applying again. That lets the drums cool between applications. Riding the brakes lightly the whole way down does the opposite, heating the drums until the brakes fade and the pedal goes soft. Escape ramps exist on long grades precisely because brake failure is a known, survivable event if you use the ramp — damage to the truck is always preferable to continuing downhill out of control.
The safe speed for a downgrade depends on total vehicle weight, the length and steepness of the grade, the road and weather conditions, and the amount of traffic — not on engine size, brake type, or the posted limit alone.
1.4 Night, Fog, Winter, and Reduced Visibility
About half of all fatal crashes happen at night even though far less traffic is on the road, because both your eyes and your headlights limit what you can see. Low beams light roughly 250 feet ahead and high beams roughly 350 to 500 feet, so at highway speed it is easy to be traveling faster than you can stop within the lighted distance — a condition called overdriving your headlights. The fix is to slow down. Use high beams when it is legal and safe, dim them well before meeting oncoming traffic or when following another vehicle, and if a driver fails to dim, look toward the right edge of the road instead of into the glare.
Fog calls for low beams, because high beams reflect off water droplets and reduce visibility further. If fog becomes dense enough that you cannot see, the right decision is to leave the roadway entirely, get well clear of the travel lanes, and turn on your four-way flashers — never crawl along or tailgate another vehicle's tail lights.
Winter driving starts before you leave: confirm the defroster and wipers work, that lights and reflectors are clear, and that the exhaust system has no leaks. On the road, watch for black ice, which looks like nothing more than wet pavement, and remember that bridges freeze first. If you drive through deep standing water your brakes will be wet and weak, and you restore them by driving slowly while applying light, steady pressure to generate the heat that dries the linings. Hydroplaning can begin at speeds as low as 30 mph when enough water is standing on the road, and worn or under-inflated tires make it far more likely; the recovery is to release the accelerator, push in the clutch, and let the tires slow until they contact the pavement again rather than braking.
1.5 Skid Recovery
A skid happens when the tires lose their grip on the road, and the cause is almost always driving too fast for conditions, over-braking, over-steering, or over-accelerating for the available traction. The two skids the test asks about are the drive-wheel skid and the front-wheel skid.
A drive-wheel skid — the classic slippery-road skid that leads to a jackknife — happens when the rear (drive) wheels lose traction, often from braking too hard or accelerating too much on a slick surface. The recovery is to stop braking to let the wheels roll again, push in the clutch to remove engine drag from the drive wheels, and steer in the direction you want to go, then countersteer to bring the rear back in line. A locked wheel cannot steer, so releasing the brake is what restores control.
A front-wheel skid is when the front (steer) tires lose grip and the vehicle keeps going straight even though you are turning the wheel. It comes from too much speed for the turn, worn or under-inflated front tires, or too little weight on the front axle. The only cure is to slow down: take your foot off the accelerator and let the front tires regain traction. Turning the wheel further only makes it worse.
1.6 Seeing, Communicating, and Special Situations
Good drivers look far enough ahead to have options. The standard is 12 to 15 seconds of travel — roughly one city block in town and about a quarter mile at highway speed — which gives you time to slow or change lanes instead of reacting at the last instant. Check your mirrors regularly, about every 5 to 8 seconds, and always before and during a lane change, a turn, or a speed change. Know where your no-zones (blind spots) are: directly in front of the cab, along both sides with the right side by far the largest, and directly behind the trailer.
Communicating means making your intentions obvious to drivers who cannot guess what a 70-foot vehicle is about to do. Signal early, signal continuously, and cancel the signal after the maneuver. Use four-way flashers when you are moving well below the flow of traffic or are stopped, and tap the horn only when it will genuinely prevent a collision.
Railroad crossings deserve special attention because a long vehicle can be trapped on the tracks: never start across unless you are certain there is room on the far side for the entire vehicle, do not shift gears while crossing, and remember that placarded hazmat vehicles, most buses, and cargo tank vehicles must stop between 15 and 50 feet from the nearest rail. Work zones require lower speed, extra following distance, no unnecessary lane changes, and constant awareness that workers may be on foot beside your lane; fines are commonly doubled. If you must stop on the shoulder, get as far off the roadway as possible, turn on the flashers immediately, and place your warning devices within 10 minutes — on a divided or one-way road, at roughly 10, 100, and 200 feet behind the vehicle toward approaching traffic.
Key Numbers & Facts — Chapter 1 (memorize cold)
| Item | Value / rule |
|---|---|
| Three parts of stopping distance | Perception + reaction + braking |
| Total stopping distance at 55 mph, dry | ~300 ft (longer than a football field) |
| Effect of doubling speed on braking distance | ~4× longer (grows with the square of speed) |
| Empty vs. loaded stopping | Empty often needs MORE distance (less traction, earlier lockup) |
| Wet / packed snow / ice | Wet ~2× distance; ice up to ~6× |
| Following distance (under 40 mph) | 1 sec per 10 ft of vehicle length |
| Following distance (over 40 mph) | Length-based seconds + 1 second |
| Add for rain / snow / fog | At least +1 second |
| Curve speed | ~10 mph below the posted curve speed; brake before, not in, the curve |
| Downgrade braking | Snub braking: firm to ~5 mph below safe speed, release, repeat; low gear chosen first |
| Low beam / high beam range | ~250 ft / ~350–500 ft |
| Fog | Low beams; if you can't see, pull fully off + four-way flashers |
| Hydroplaning can start at | As low as 30 mph in standing water |
| Wet-brake recovery | Drive slowly + light steady pressure to dry linings |
| Drive-wheel skid recovery | Stop braking, push in clutch, steer where you want to go |
| Front-wheel skid cure | Slow down (off accelerator); too much speed/worn front tires |
| Look ahead | 12–15 seconds (~¼ mile at highway speed) |
| Mirror checks | Every 5–8 seconds and before every maneuver |
| Largest blind spot | Right side, plus front of cab and directly behind trailer |
| RR crossing stop (placarded hazmat/bus/cargo tank) | 15–50 ft from nearest rail, no shifting on tracks |
| Warning devices after stopping | Within 10 minutes; divided road ~10 / 100 / 200 ft back |
Road Scenario — A Wet Downgrade at Dusk
You crest a ridge with a loaded van trailer as a light rain begins after a dry afternoon, and a sign warns of a steep 6 percent grade ahead. Traffic is moving at the 55 mph limit.
Work it the way the exam wants. The road is wettest and most slippery right now, as the first rain floats oil to the surface, so you back off the accelerator and add space — you want at least a second more than the 5 seconds your 55-foot rig already needs above 40 mph. Before the grade, while you still have road speed, you downshift into a gear low enough to hold your speed with little braking; once you are descending you may not be able to get a lower gear at all. Going down, you pick a safe speed and use snub braking — firm pressure to slow about 5 mph, then full release to let the drums cool — rather than riding the brakes and cooking them into fade. You keep the drive wheels lightly loaded so they do not skid on the wet surface, and you keep looking 12 to 15 seconds ahead for the brake lights that mean traffic is stacking up at the bottom. Every decision is the same move: give up a little speed now to keep control you cannot buy back later.
Exam Traps — Chapter 1
- The "double the speed, double the distance" trap. Braking distance grows with the square of speed, so doubling speed makes it about four times longer. Any answer that says "twice as far" is wrong.
- The empty-truck trap. An empty vehicle often needs a longer stopping distance than a loaded one, because there is less weight pressing the tires down. "Lighter stops shorter" is the wrong instinct.
- The following-distance trap. The rule is one second per 10 feet of length under 40 mph, plus one second over 40 mph — length first, then a speed add-on. Watch for answers that use a flat "two-second rule" (that is a car rule) or forget the extra second above 40.
- The curve-braking trap. Finish braking before the curve and accelerate gently through it. Braking hard in the curve, or coasting through above the posted speed, invites a skid or rollover.
- The high-beams-in-fog trap. Fog, heavy rain, and snow call for low beams; high beams reflect back and make it worse.
- The skid-recovery trap. In a drive-wheel skid you release the brake and steer — you do not brake harder or accelerate. A locked wheel cannot steer.
- The blind-spot trap. The right side is the largest no-zone, not the left. Answers that say the only blind spot is behind the trailer or on the driver's side are wrong.
购买者常问的问题
怎么拿到?
付款后下载入口立即出现在本页,链接同时发到你的邮箱。无需注册账号。
不合适怎么办?
14 天内发邮件即可全额退款,无需理由。
免费练习会取消吗?
不会。站上的每一道练习题、计时模考和免费章节都继续免费。这本书是「学」的那一半,不是把免费部分围起来的门。
更多问题 (1)
能在手机上看吗?
可以 —— EPUB 适合手机和电子书阅读器,PDF 适合打印和贴标签,两种都给你。
练习免费,为什么还要买书?
我们的练习题和计时模考一直免费 —— 网站上的东西不会因为这本书而收起来。这本 $9.99 的书是「学」的那一半:知识本身,按顺序讲清楚,存成一份属于你的文件。
- 系统讲解 —— 每个考试部分按章节从头讲到尾,不只是题目
- 可打印可贴标签 —— 一份适合打印的 PDF,能划重点、做批注、带到书桌前
- 随处离线学 —— EPUB 放手机或电子书阅读器;不用 wifi,不用一堆浏览器标签
- 全在一处 —— 章节和练习题都在同一份文件里
- 永久归你 —— 一次 $9.99,即时下载,无订阅
详细信息
- 官方来源核验(FMCSA regulations (49 CFR 383/392/393/395/396) / AAMVA model CDL manual)
- 120 道免费练习题
CDL exam prep course 要 $100–$500。这本书讲的是同一门考试 —— 同样的规则、核对到最新标准 —— 只需一次性 $9.99,永久归你。
一次购买,永久下载访问。此电子书是完整的 CDL General Knowledge 学习指南,含 PDF 与 EPUB。仅为教育性摘要,非专业或法律意见 —— 请始终以官方来源核实当前规定。最后更新:October 2026。